1 VM + 3 Container + Docker CLI + Key Authentication – LAB 03 – Thực hành LAB
1. Chạy LAB
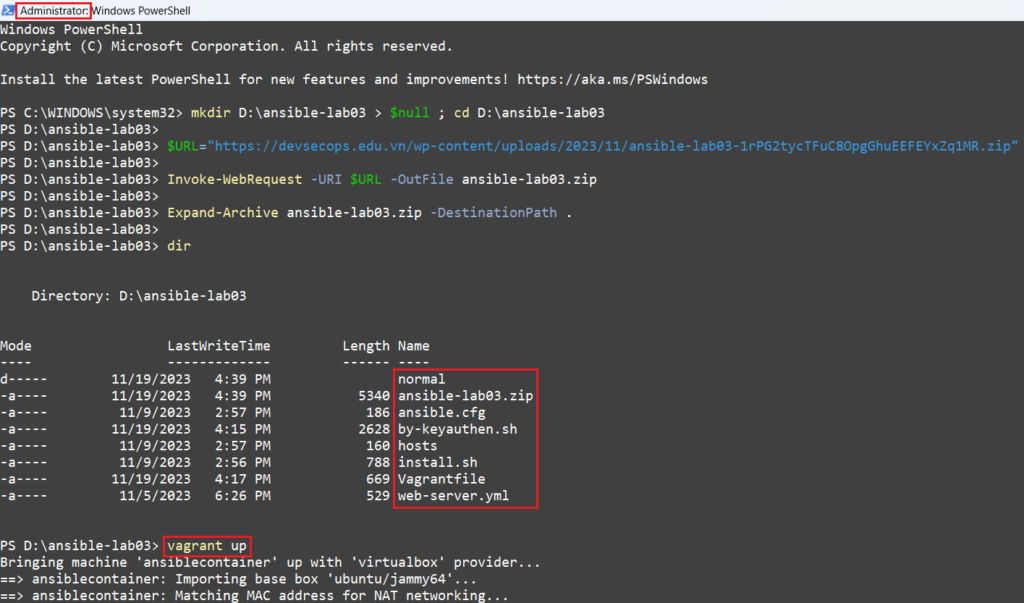
 Copy 6 lệnh dưới → dán trên PowerShell bằng cách click chuột phải
→ không phải gõ gõ từng lệnh mất thời gian
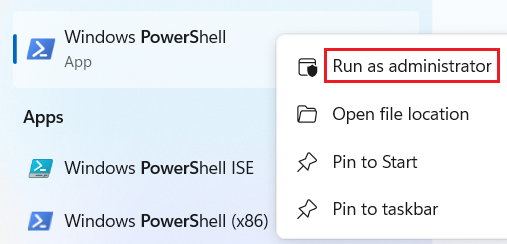
 Chạy 6 lệnh sau trên Powershell quyền Administrator → dấu # là giải thích (comment)
# Giả sử có ổ đĩa D:
# Tạo thư mục D:ansible-lab03 + chuyển vào thư mục
mkdir D:ansible-lab03 > $null ; cd D:ansible-lab03

# Khai báo biến là link tới file cần download
$URL="https://devsecops.edu.vn/wp-content/uploads/2023/11/ansible-lab03-1rPG2tycTFuC8OpgGhuEEFEYxZq1MR.zip"

# Download file zìa
Invoke-WebRequest -URI $URL -OutFile ansible-lab03.zip

# Giải nén file + đổi tên
Expand-Archive ansible-lab03.zip -DestinationPath .

# Coi trong thư mục đang đứng có gì
dir

# Tạo máy ảo + chạy LAB từ A tới Á
vagrant up

2. Các file nội dung mới nhất ở đây
Vagrantfile
Vagrant.configure("2") do |config|

  config.vm.define "ansiblecontainer" do |ansiblecontainer|

    ansiblecontainer.vm.box = "ubuntu/jammy64"
    ansiblecontainer.vm.hostname = 'ubuntu2204'

    ansiblecontainer.vm.provider :virtualbox do |v|
      v.gui = true
      v.cpus = 2
      v.customize ["modifyvm", :id, "--natdnshostresolver1", "on"]
      v.customize ["modifyvm", :id, "--memory", 2048]
      v.customize ["modifyvm", :id, "--name", "Ansible-1VM-3Container-Docker-CLI-Key-Authen"]
    end

  ansiblecontainer.vm.provision "shell", path: "install.sh"
  ansiblecontainer.vm.provision "shell", path: "by-keyauthen.sh"

  end

end
install.sh
#!/bin/bash

echo -e "n1. Cài Docker, docker-composen"
apt update && apt install docker.io docker-compose pip -y
systemctl status docker

echo -e "n2. Cài Ansiblen"
apt -y install ansible-core sshpass
ansible --version

# Chép file config của Ansible
mkdir /etc/ansible
cp /vagrant/ansible.cfg /etc/ansible/
cp /vagrant/hosts /etc/ansible/

# Sửa lỗi https://devsecops.edu.vn/ansible-control-node-tren-ubuntu-server-2204-loi-ansible-galaxy/
pip install -Iv 'resolvelib<0.6.0'

# Cài collection community.general để chạy được lệnh apk
# https://docs.ansible.com/ansible/latest/collections/community/general/apk_module.html
ansible-galaxy collection install community.general

echo -e "n3. Xem Ansible collection đã càin"
ansible-galaxy collection list

# END
by-keyauthen.sh
#!/bin/bash

echo -e "n1. Tạo 3 node bằng 3 containern"

# Build AlmaLinux 9.2 chạy OpenSSH Server
cd /vagrant/normal/alma92
docker build                 -t       devsecops.edu.vn/alma92-ssh-keyauthen:1.0 .
docker run --name alma92-keyauthen -d devsecops.edu.vn/alma92-ssh-keyauthen:1.0

# Build Ubuntu Server 22.04.3 chạy OpenSSH
cd /vagrant/normal/ubuntu2204
docker build -t                           devsecops.edu.vn/ubuntu2204-ssh-keyauthen:1.0 .
docker run --name ubuntu2204-keyauthen -d devsecops.edu.vn/ubuntu2204-ssh-keyauthen:1.0

# Build Alpine Linux 3.18 chạy OpenSSH Server
cd /vagrant/normal/alpine318
docker build -t                          devsecops.edu.vn/alpine318-ssh-keyauthen:1.0 .
docker run --name alpine318-keyauthen -d devsecops.edu.vn/alpine318-ssh-keyauthen:1.0

echo -e "n2. 3 Container image đã build (READ ONLY)n"
docker image ls

echo -e "n3. 3 Container đang chạy (READ WRITE)n"
docker container ls

echo -e "n4. Chép public key vào containern"

# Tạo public/private key --> private key là id_rsa
cd
ssh-keygen -q -t rsa -b 2048 -N '' -C 'DevSecOps.Edu.VN' -f /root/.ssh/id_rsa

# Chép public key là id_rsa.pub vào 3 Container đang chạy
docker cp /root/.ssh/id_rsa.pub     alma92-keyauthen:/root/.ssh/authorized_keys
docker cp /root/.ssh/id_rsa.pub ubuntu2204-keyauthen:/root/.ssh/authorized_keys
docker cp /root/.ssh/id_rsa.pub  alpine318-keyauthen:/root/.ssh/authorized_keys

echo -e "n5. Xài Ansible Inventory với 3 container đang chạyn"

# Lấy 3 IP của 3 Container đang chạy
export     Alma92_IP=$(docker inspect --format='{{range .NetworkSettings.Networks}}{{.IPAddress}}{{end}}' alma92-keyauthen)
export Ubuntu2204_IP=$(docker inspect --format='{{range .NetworkSettings.Networks}}{{.IPAddress}}{{end}}' ubuntu2204-keyauthen)
export  Alpine318_IP=$(docker inspect --format='{{range .NetworkSettings.Networks}}{{.IPAddress}}{{end}}' alpine318-keyauthen)

# Thay 3 IP của 3 Container vào file Ansible Inventory dưới
sed -i "s/alma92_ip_keyauthen/$Alma92_IP/"         /etc/ansible/hosts
sed -i "s/ubuntu2204_ip_keyauthen/$Ubuntu2204_IP/" /etc/ansible/hosts
sed -i "s/alpine318_ip_keyauthen/$Alpine318_IP/"   /etc/ansible/hosts

echo -e "nAnsible coi group vừa tạo từ 3 containern"
ansible-inventory --graph

echo -e "nAnsible ping 3 node chạy containern"
ansible ssh_keyauthen -m ping

echo -e "nAnsible chạy lịnh tới 3 container không tối ưun"
ansible ssh_keyauthen -a 'cat /etc/os-release'

echo -e "nAnsible chạy playbook tới 3 container không tối ưun"
ansible-playbook /vagrant/web-server.yml

# END
ansible.cfg
[defaults]
host_key_checking=False

# Sửa lỗi
# https://devsecops.edu.vn/ansible-galaxy-bi-loi-gi-vay-khi-cai-ansible-collections/
[galaxy]
server = https://old-galaxy.ansible.com/
hosts
[ssh_keyauthen]
alma92_ip_keyauthen
ubuntu2204_ip_keyauthen
alpine318_ip_keyauthen

[all:vars]
ansible_user=root
ansible_ssh_private_key_file=/root/.ssh/id_rsa
web-server.yml
---
- hosts: ssh_keyauthen
  tasks:

    - name: Cài Apache Web Server mới nhứt trên Ubuntu 22.04
      apt:
        name: apache2
      when: ansible_distribution == "Ubuntu"

    - name: Cài Apache Web Server mới nhứt trên AlmaLinux 9
      yum:
        name: httpd
      when: ansible_distribution == "AlmaLinux"

    - name: Cài Apache Web Server mới nhứt trên Alpine Linux 3.18
      apk:
        name: apache2
        state: present
      when: ansible_distribution == "Alpine"
# Lấy cục image container zìa
FROM almalinux:9.2
# Cài openssh server + client + các tool mần lab
RUN dnf -y install openssh-server openssh-clients passwd iproute
# Trên dòng EL, start ssh k tự tạo ra host keys --> lỗi
# --> Tạo thêm 2 host key
RUN ssh-keygen -f /etc/ssh/ssh_host_rsa_key -N '' -C 'DevSecOps.Edu.VN' -t rsa
RUN ssh-keygen -f /etc/ssh/ssh_host_ecdsa_key -N '' -C 'DevSecOps.Edu.VN' -t ecdsa
# Tạo thư mục này để chép public key vào
RUN mkdir /root/.ssh
# Config k cho authen = password
RUN sed -i '/^#PasswordAuthentication.*/a PasswordAuthentication no' /etc/ssh/sshd_config
# Đổi password cho root là 1
RUN echo "1" | passwd root --stdin
EXPOSE 22
# Do hổng có systemd start dịch vụ sshd
# Chạy sshd trực tiếp bằng lịnh dưới
CMD ["/usr/sbin/sshd", "-D"]FROM alpine:3.18.2
# Cài python3 để Ansible control node móc vào được
RUN apk add openssh-server openssh-client iproute2 python3
# K cho SSH = password
RUN echo 'PasswordAuthentication no' >> /etc/ssh/sshd_config
RUN echo 'PermitRootLogin yes' >> /etc/ssh/sshd_config
# Tạo các host key
RUN ssh-keygen -A
# Tạo thư mục này để chép public key vào
RUN mkdir /root/.ssh
# Set password root là 1
RUN echo 'root:1' | chpasswd
# Tạo các file cần thiết để start dịch vụ SSH
RUN mkdir -p /run/openrc
RUN touch /run/openrc/softlevel
EXPOSE 22
CMD ["/usr/sbin/sshd", "-D"]# Lấy cục image container zìa, nó là read only nhen
FROM ubuntu:22.04
# Cài openssh server...
RUN apt update
RUN apt -y install openssh-server openssh-client iproute2 init-system-helpers
# Đổi password cho root là 1
RUN echo "root:1" | chpasswd
# K cho authen = password, cho root login = SSH
RUN echo "PermitRootLogin yes" >> /etc/ssh/sshd_config
RUN echo "PasswordAuthentication no" >> /etc/ssh/sshd_config
# Tạo thư mục này để chép public key vào
RUN mkdir /root/.ssh
# Start dịch vụ SSH
RUN service ssh start
EXPOSE 22
# Do hổng có systemd start dịch vụ sshd
# Chạy sshd trực tiếp bằng lịnh dưới
CMD ["/usr/sbin/sshd", "-D"]