4. Xài Vagrant từ A tới Á – LAB tổng hợp
1. Làm sao để biết Vagrantfile có những khai báo gì?
![]() Xài lịnh vagrant init để tạo Vagrantfile mẫu
Xài lịnh vagrant init để tạo Vagrantfile mẫu
→ coi các tham số + giải thích bằng tiếng Ăng Lê
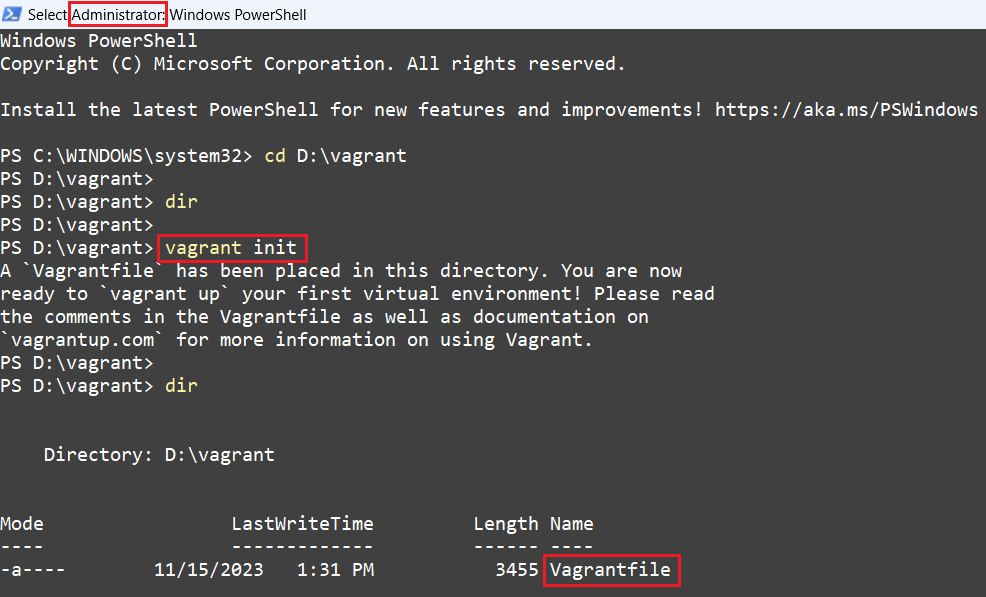
→ dấu # là ghi chú (comment)
# -*- mode: ruby -*-
# vi: set ft=ruby :

# All Vagrant configuration is done below. The "2" in Vagrant.configure
# configures the configuration version (we support older styles for
# backwards compatibility). Please don't change it unless you know what
# you're doing.
Vagrant.configure("2") do |config|
  # The most common configuration options are documented and commented below.
  # For a complete reference, please see the online documentation at
  # https://docs.vagrantup.com.

  # Every Vagrant development environment requires a box. You can search for
  # boxes at https://vagrantcloud.com/search.
  config.vm.box = "base"

  # Disable automatic box update checking. If you disable this, then
  # boxes will only be checked for updates when the user runs
  # `vagrant box outdated`. This is not recommended.
  # config.vm.box_check_update = false

  # Create a forwarded port mapping which allows access to a specific port
  # within the machine from a port on the host machine. In the example below,
  # accessing "localhost:8080" will access port 80 on the guest machine.
  # NOTE: This will enable public access to the opened port
  # config.vm.network "forwarded_port", guest: 80, host: 8080

  # Create a forwarded port mapping which allows access to a specific port
  # within the machine from a port on the host machine and only allow access
  # via 127.0.0.1 to disable public access
  # config.vm.network "forwarded_port", guest: 80, host: 8080, host_ip: "127.0.0.1"

  # Create a private network, which allows host-only access to the machine
  # using a specific IP.
  # config.vm.network "private_network", ip: "192.168.33.10"

  # Create a public network, which generally matched to bridged network.
  # Bridged networks make the machine appear as another physical device on
  # your network.
  # config.vm.network "public_network"

  # Share an additional folder to the guest VM. The first argument is
  # the path on the host to the actual folder. The second argument is
  # the path on the guest to mount the folder. And the optional third
  # argument is a set of non-required options.
  # config.vm.synced_folder "../data", "/vagrant_data"

  # Disable the default share of the current code directory. Doing this
  # provides improved isolation between the vagrant box and your host
  # by making sure your Vagrantfile isn't accessable to the vagrant box.
  # If you use this you may want to enable additional shared subfolders as
  # shown above.
  # config.vm.synced_folder ".", "/vagrant", disabled: true

  # Provider-specific configuration so you can fine-tune various
  # backing providers for Vagrant. These expose provider-specific options.
  # Example for VirtualBox:
  #
  # config.vm.provider "virtualbox" do |vb|
  #   # Display the VirtualBox GUI when booting the machine
  #   vb.gui = true
  #
  #   # Customize the amount of memory on the VM:
  #   vb.memory = "1024"
  # end
  #
  # View the documentation for the provider you are using for more
  # information on available options.

  # Enable provisioning with a shell script. Additional provisioners such as
  # Ansible, Chef, Docker, Puppet and Salt are also available. Please see the
  # documentation for more information about their specific syntax and use.
  # config.vm.provision "shell", inline: <<-SHELL
  #   apt-get update
  #   apt-get install -y apache2
  # SHELL
end
2. Các lệnh Vagrant thường xài khác
# Máy ảo đang chạy
vagrant status

# Tắt máy ảo
# --> bật lên lại thì vagrant up
vagrant halt

# Máy ảo đã tắt
vagrant status

# Xóa máy ảo có hỏi --> chọn N
vagrant destroy vmware

# Xóa máy ảo không hỏi
vagrant destroy vmware -f

# Máy ảo đã xóa
vagrant status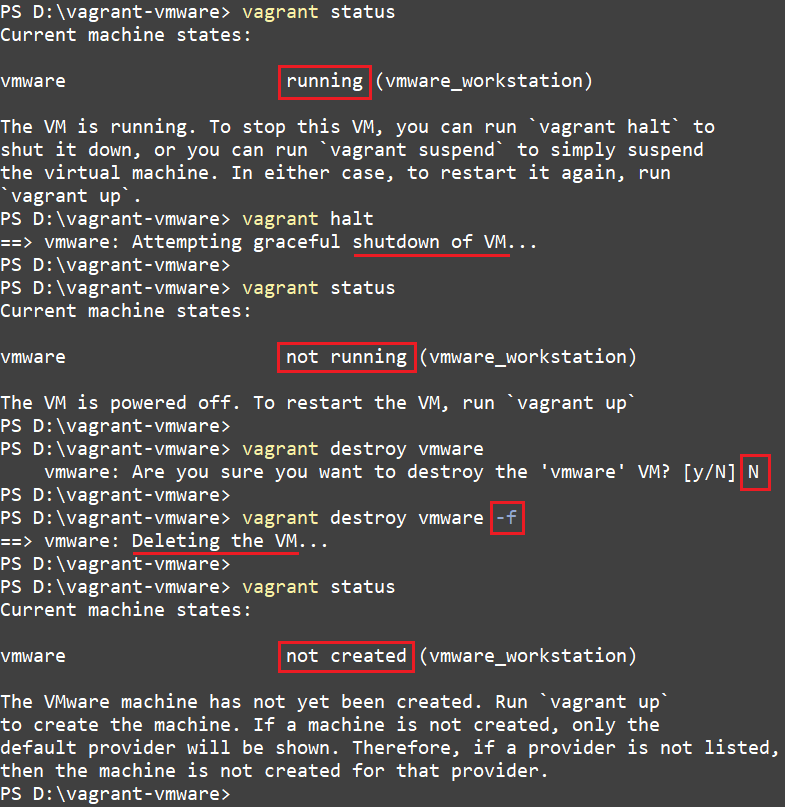
Tất cả lệnh của Vagrant thì
# Có nhiều command bên trong lắm
vagrant --help

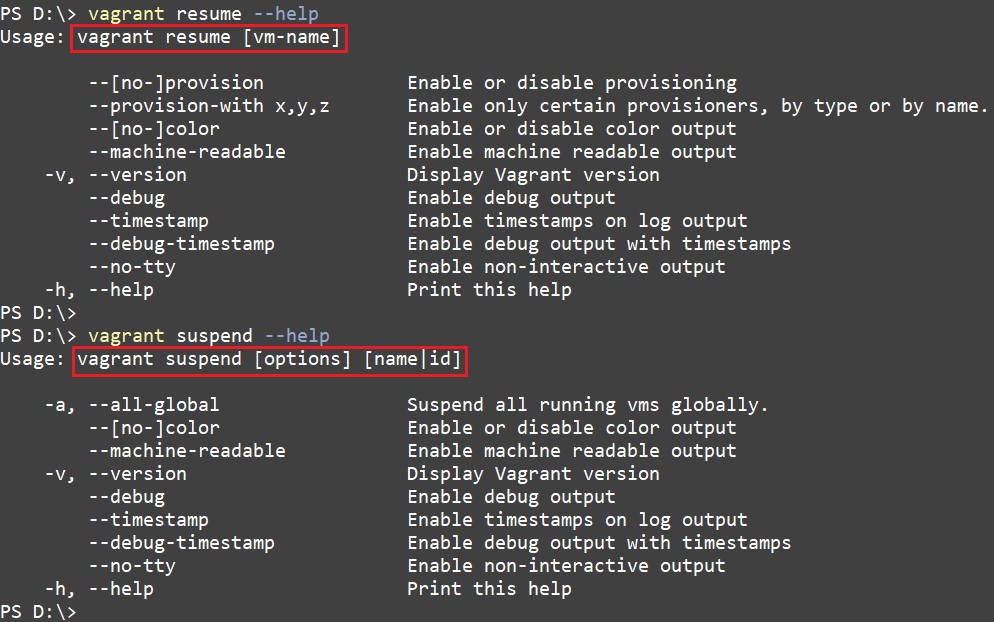
# Đi sâu vào từng command lệnh có gì
vagrant resume --help
vagrant suspend --help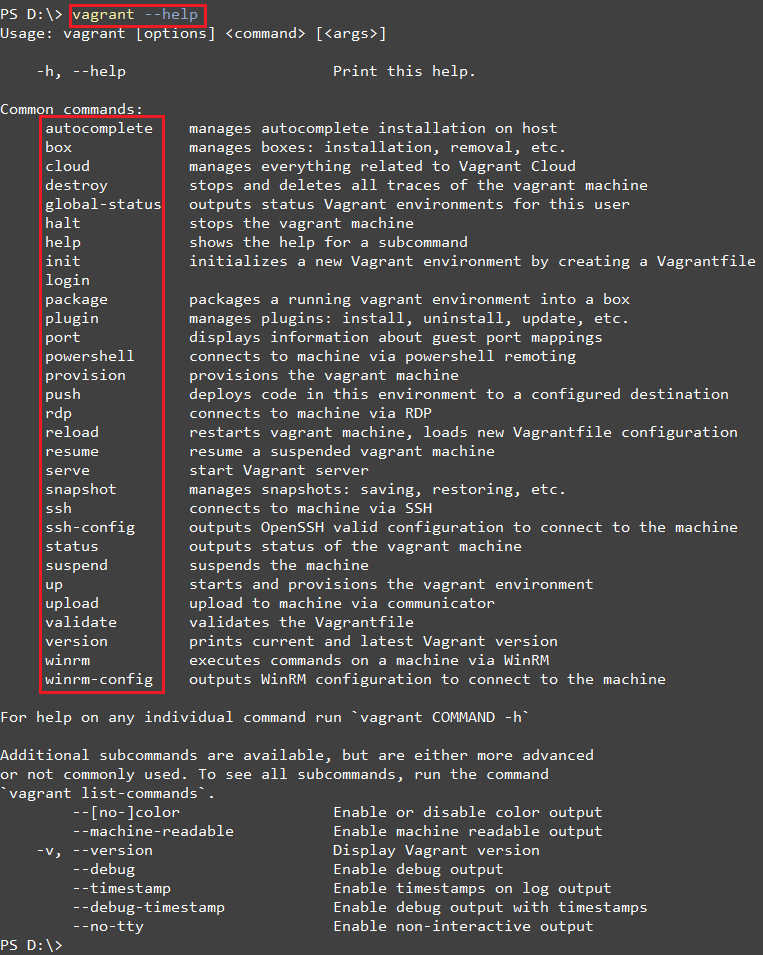
3. Cục OS image = Vagrant box
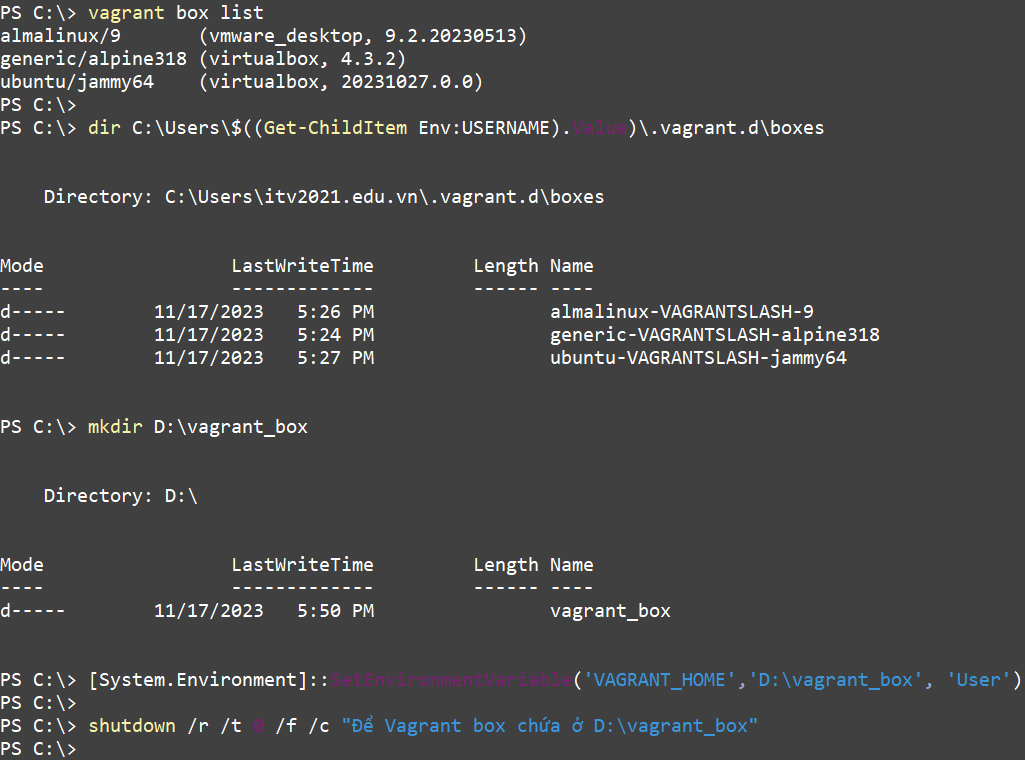
# Xem các OS image = box của Vagrant đã download về để bung ra làm máy ảo
vagrant box list

# Mặc định các file của box sẽ nằm ở đường dẫn dưới của user cài
dir C:Users$((Get-ChildItem Env:USERNAME).Value).vagrant.dboxes

# Set biến môi trường VAGRANT_HOME cho user để box nằm ở D:vagrant_box
[System.Environment]::SetEnvironmentVariable('VAGRANT_HOME','D:vagrant_box', 'User')

# Tự động Restart Windows liền
# Đã test nếu không Restart Windows thì box không nằm ở đường dẫn của biến VAGRANT_HOME
shutdown /r /t 0 /f /c "Để Vagrant box chứa ở D:vagrant_box"

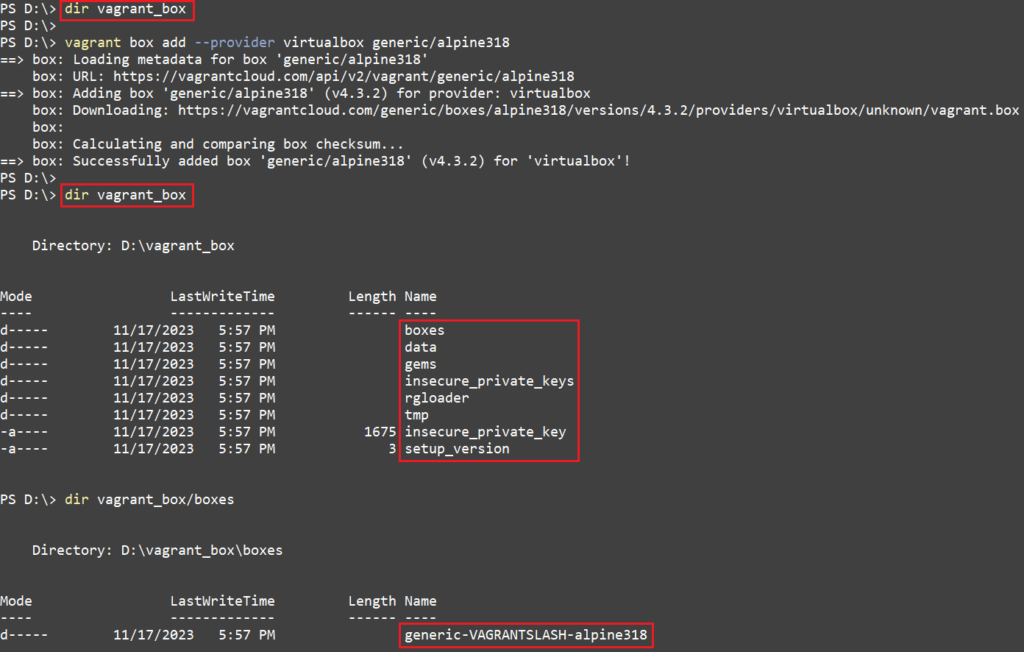
# Sau khi Restart Windows --> coi D:vagrant_box chưa có gì hết
D: ; dir vagrant_box

# Lấy cục box AlpineLinux 3.18 zìa
vagrant box add --provider virtualbox generic/alpine318

# 1 đống file đã tạo ra
dir vagrant_box

# Coi bên trong có cục box
dir vagrant_box
4. Chép file qua lại giữa máy ảo và máy Host (máy chạy máy ảo)
![]() Vagrant gọi là Synced Folders
Vagrant gọi là Synced Folders
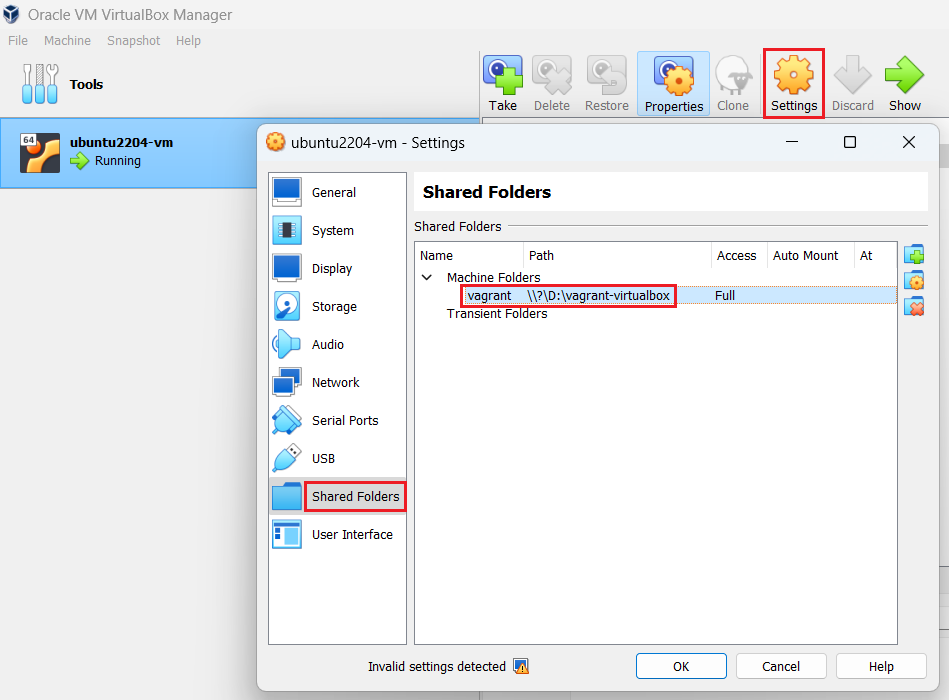
→ tự động gắn thư mục chứa Vagrantfile trên máy Host vào thư mục /vagrant của máy ảo.
![]() Chép file + thư mục từ máy Host vào thư mục chứa Vagrantfile → vào /vagrant của máy ảo thấy
Chép file + thư mục từ máy Host vào thư mục chứa Vagrantfile → vào /vagrant của máy ảo thấy
![]() Chép file + thư mục của máy ảo vào /vagrant → ra máy Host thấy.
Chép file + thư mục của máy ảo vào /vagrant → ra máy Host thấy.
1. Coi trên VirtualBox
# Bật máy ảo lên
vagrant up

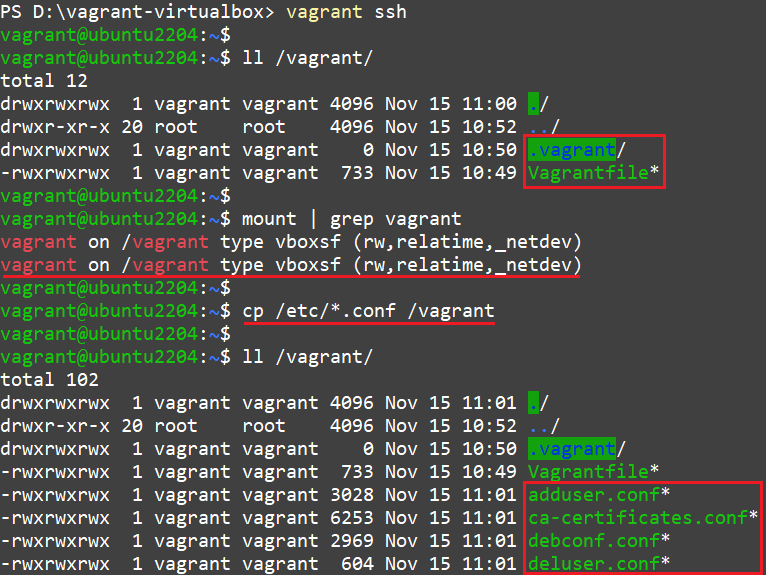
# SSH vào máy ảo
vagrant ssh

# Coi trong /vagrant của máy ảo
ll /vagrant/

# Coi các thư mục gắn vào OS (mount point) có vagrant hem?
mount | grep vagrant

# Chép các file có đuôi .conf vào /vagrant
cp /etc/*.conf /vagrant

# Coi lại
ll /vagrant/

# Thoát khỏi máy ảo + về PowerShell của Windows
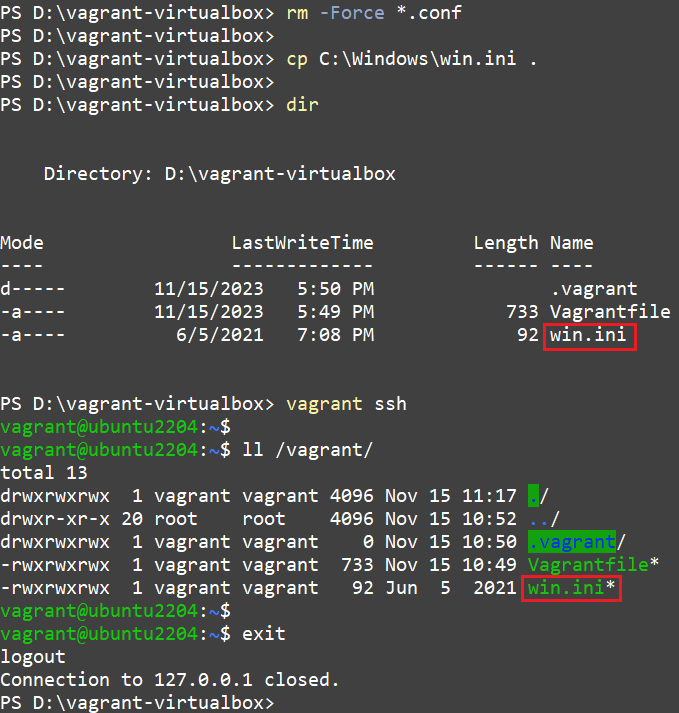
exit

# Xóa các file có đuôi .conf = lịnh Powershell
rm -Force *.conf

# Chep file vào thư mục đang đứng
cp C:Windowswin.ini .

# Coi lại có file đã chép
dir

# SSH vào máy ảo
vagrant ssh

# Coi đã thấy file mới chép vào
ll /vagrant/

exit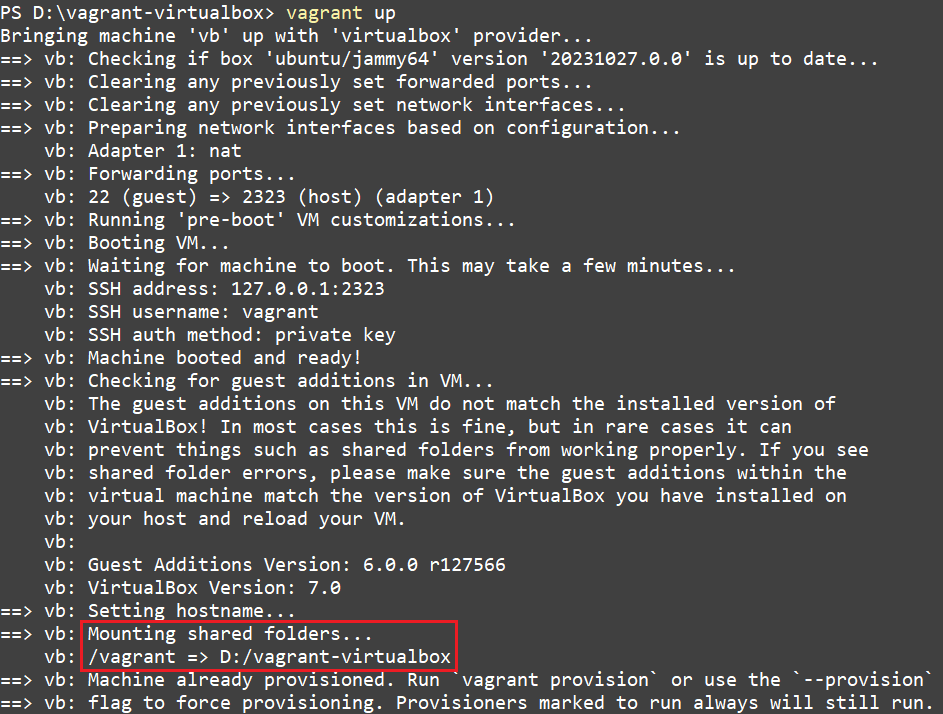
![]() Ra máy Host coi sẽ thấy
Ra máy Host coi sẽ thấy

2. Coi trên VMware Workstation
![]() Cũng như trên VirtualBox
Cũng như trên VirtualBox
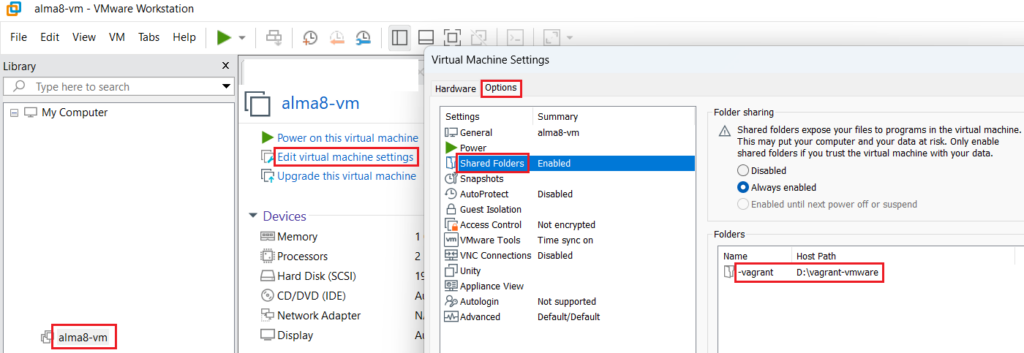
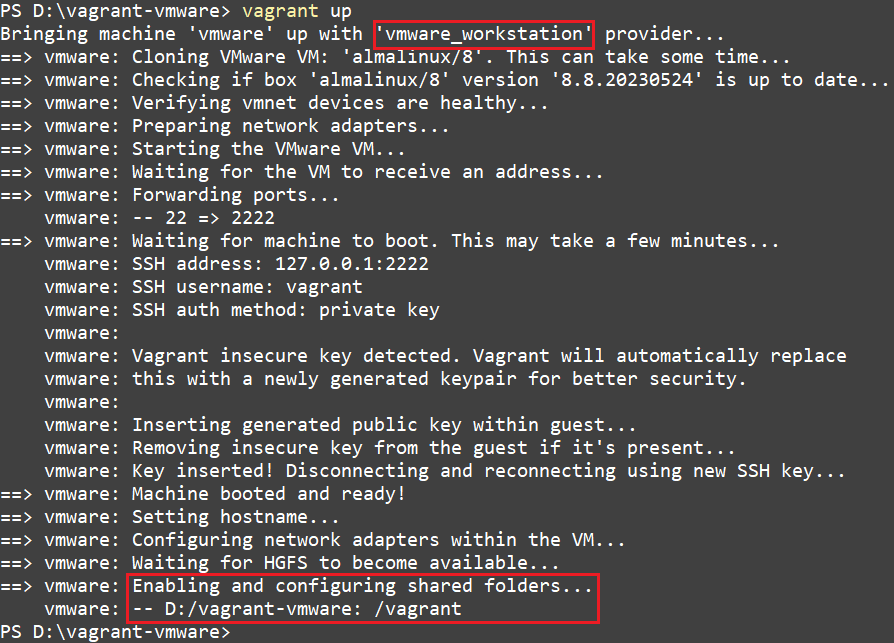
5. Vagrant plugin
![]() Coi các Vagrant plugin ở đây
Coi các Vagrant plugin ở đây
https://rubygems.org/search?query=vagrant
![]() Cài, xóa plugin thì đã làm ở bài Bài 2
Cài, xóa plugin thì đã làm ở bài Bài 2
6. Port forwarding
![]() Là cơ chế dịch (NAT – Network Address Translation) từ Port + IP của máy ảo sang Port + IP của máy Host
Là cơ chế dịch (NAT – Network Address Translation) từ Port + IP của máy ảo sang Port + IP của máy Host
→ biết được để xài các công cụ SSH client như Putty móc vào máy ảo ở bài sau
VMware Workstation
# Bật máy ảo
vagrant up

# Xem thông tin SSH của máy ảo
vagrant ssh-config

# SSH vào máy ảo
vagrant ssh

# Coi Port nào đang Listen trên máy ảo
ss -plant

# Thoát khỏi máy ảo
exit

# Coi Port nào đang Listen trên máy Host là Windows
netstat -an | Select-String 2222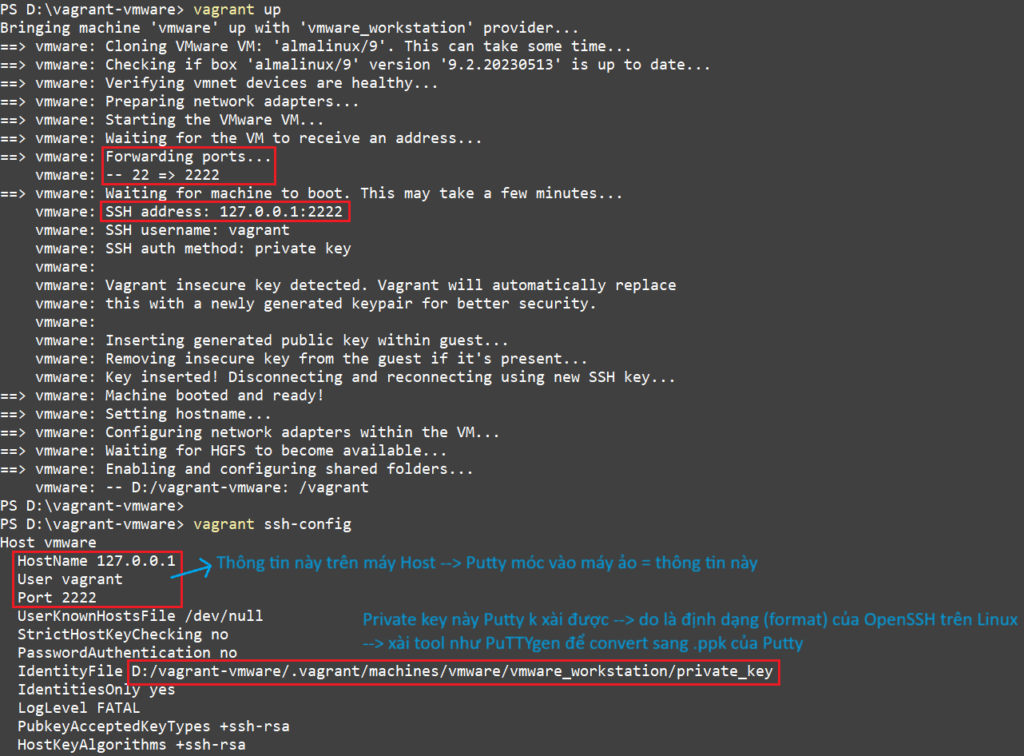
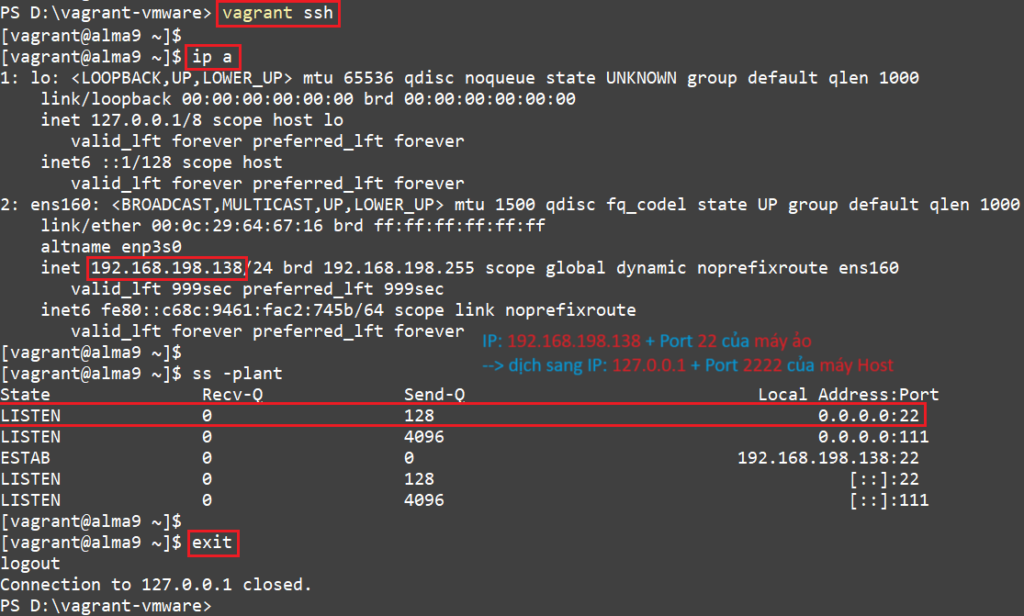
![]() Máy ảo có địa chỉ IP 192.168.198.138 → lắng nghe trên IP 0.0.0.0 + port 22
Máy ảo có địa chỉ IP 192.168.198.138 → lắng nghe trên IP 0.0.0.0 + port 22
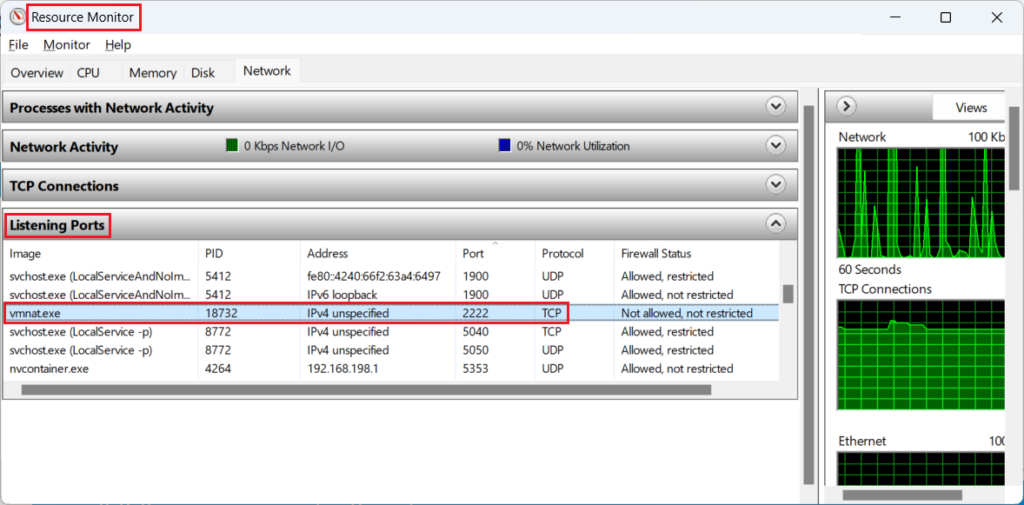
→ dịch sang máy Host lắng nghe trên IP 0.0.0.0 + port 2222

→ 0.0.0.0 là tất cả địa chỉ IP trên tất cả card mạng (NIC) của máy
→ 127.0.0.1 là địa chỉ IP chỉ truy cập được trên chính máy đó

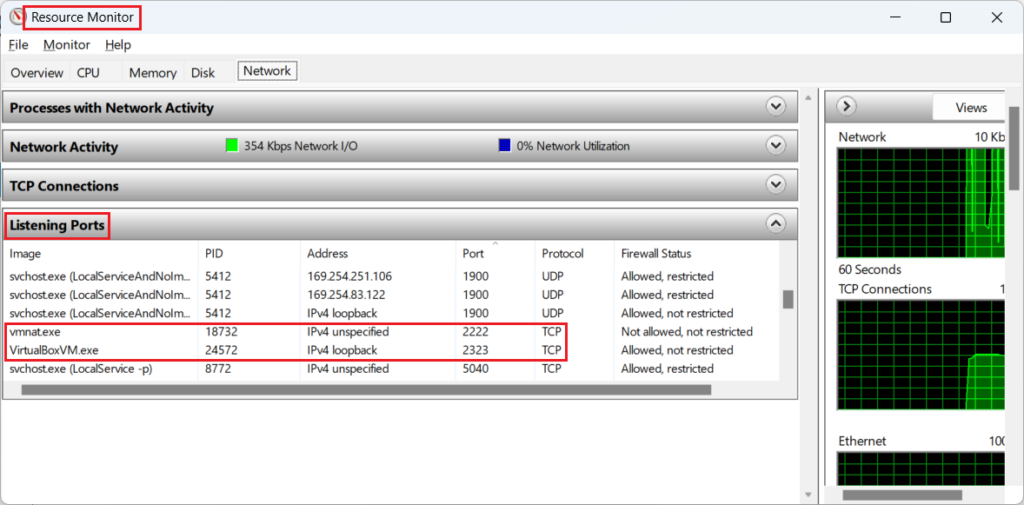
![]() Coi các port đang Listen trên máy Host bằng đồ họa → Task Manager → Resource Monitor hoặc resmon.exe
Coi các port đang Listen trên máy Host bằng đồ họa → Task Manager → Resource Monitor hoặc resmon.exe
VirtualBox
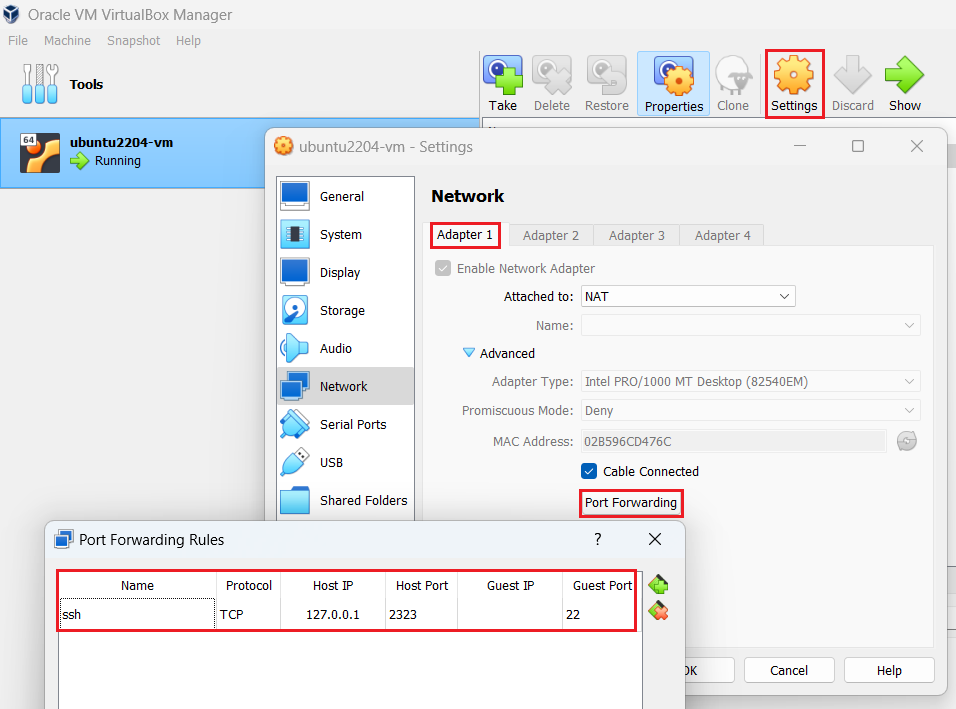
# Trong Vagrantfile có khai báo dòng này để Port Forwarding
# Không có thì Vagrant sẽ tự Port Forwarding ra 1 port ngẫu nhiên xài được trên máy Host
# Xài được nghĩa là port đó (1 số từ 0 - 65535) chưa được Listen bởi dịch vụ nào trên máy Host

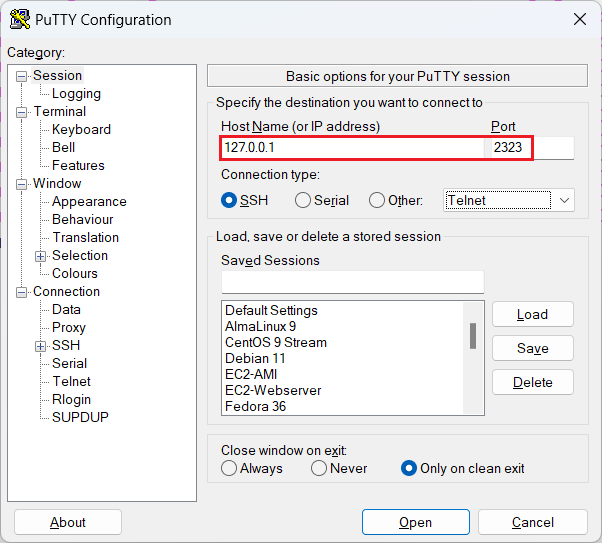
vb.vm.network :forwarded_port, guest: 22, host: 2323, id: "ssh", host_ip: "127.0.0.1", protocol: "tcp"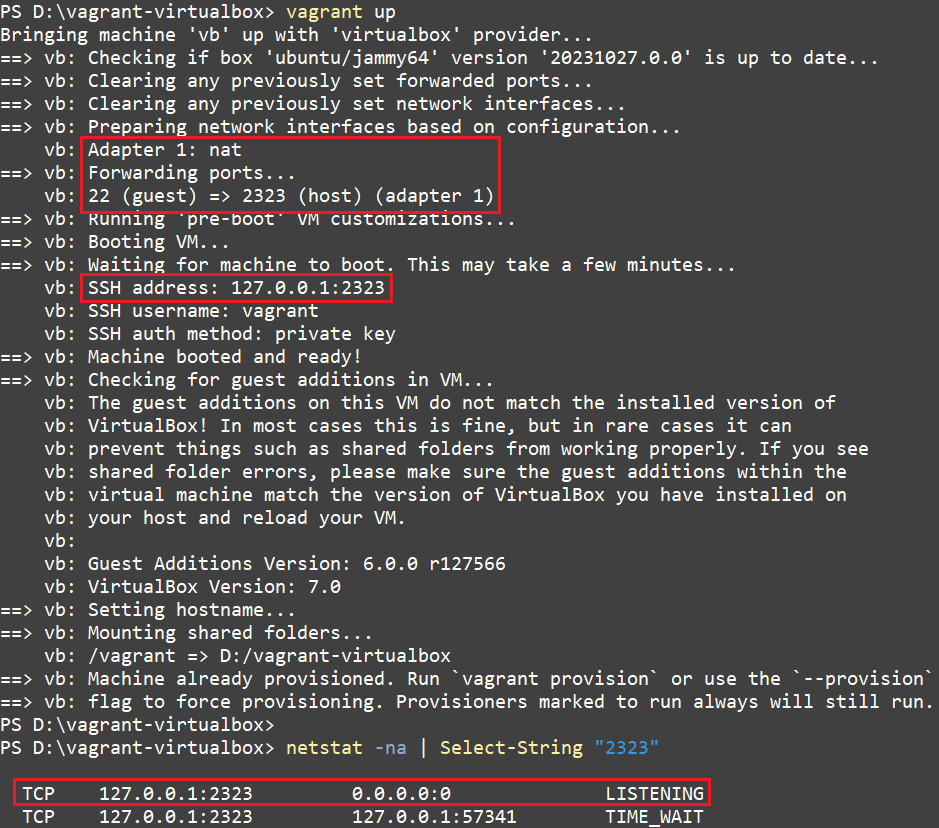
7. Putty móc vào máy ảo của Vagrant
1. Cơ chế SSH chứng thực bằng key mặc định của Vagrant
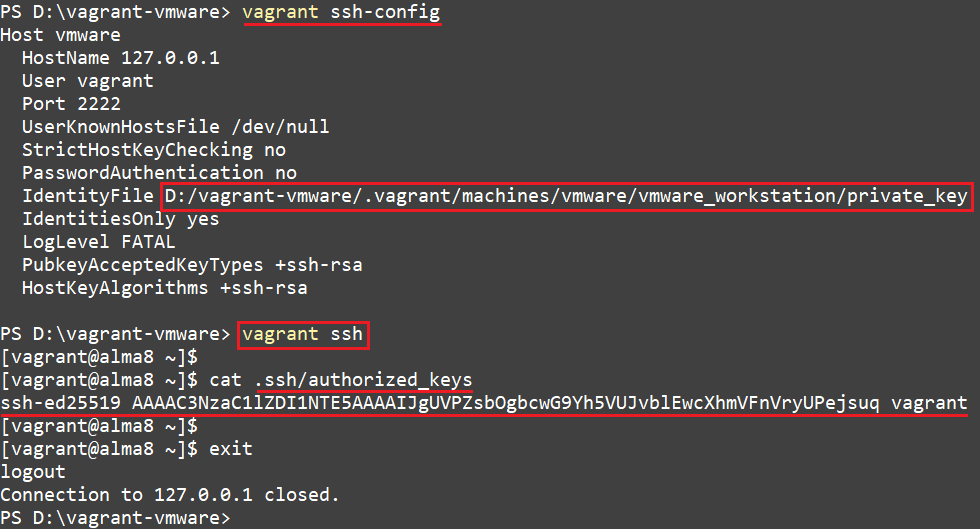
![]() Lúc mới tạo + chạy máy ảo → Vagrant sẽ tạo ra 1 cặp khóa riêng/chung (private/public key)
Lúc mới tạo + chạy máy ảo → Vagrant sẽ tạo ra 1 cặp khóa riêng/chung (private/public key)
→ Vagrant chèn public key vào máy ảo → ở /home/vagrant/.ssh/authorized_keys
→ private key nằm trên máy host
# Truy cập vào máy ảo bằng cơ chế chứng thực = key, không cần nhập password
vagrant ssh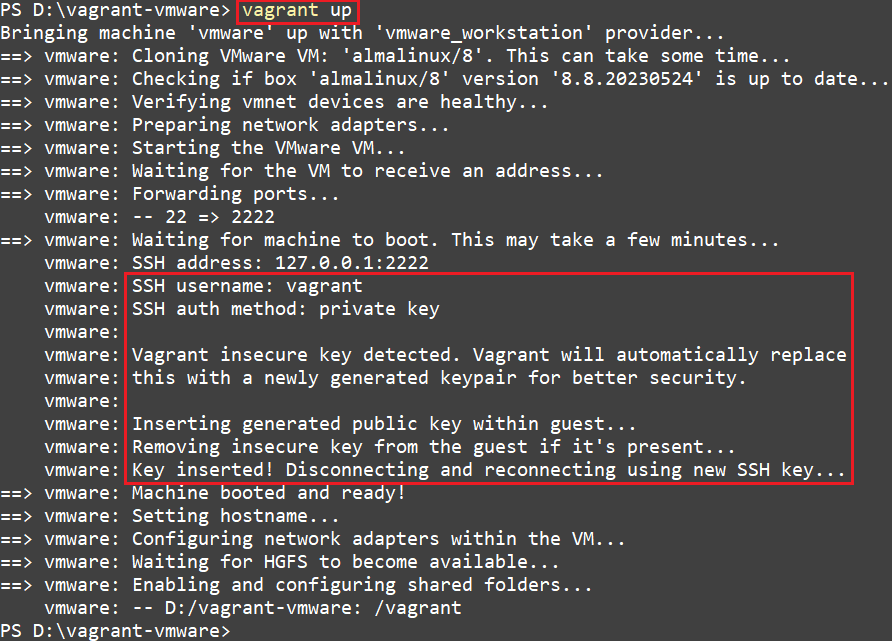
2. Putty móc vào máy ảo chạy Vagrant trên VirtualBox
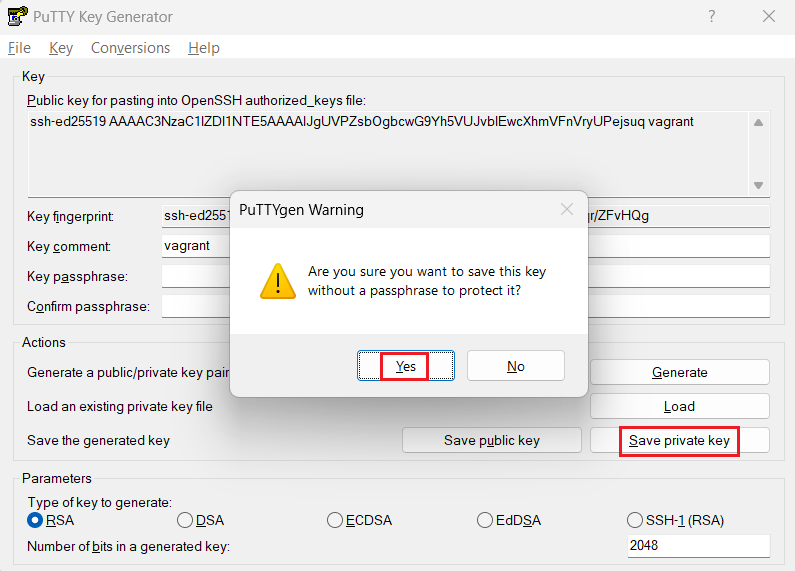
![]() Xài Puttygen tìm tới private key ở
Xài Puttygen tìm tới private key ở
D:vagrant-virtualbox.vagrantmachinesvbvirtualboxprivate_key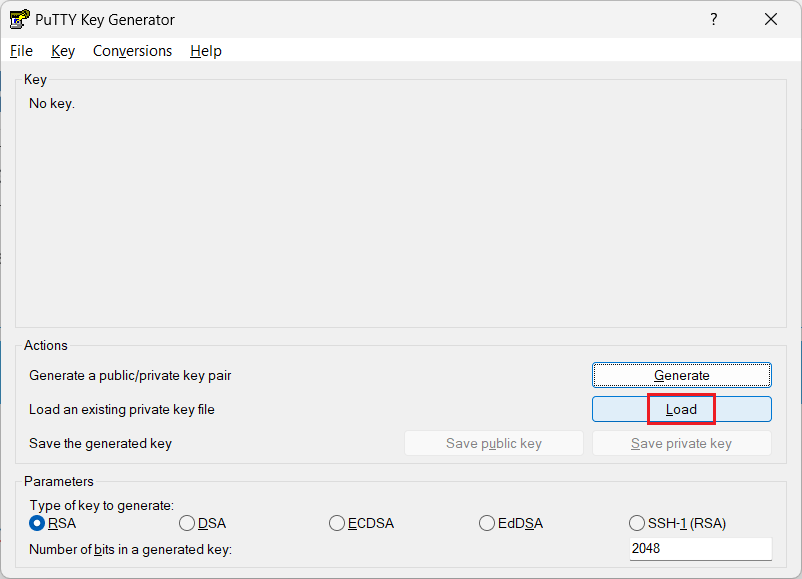
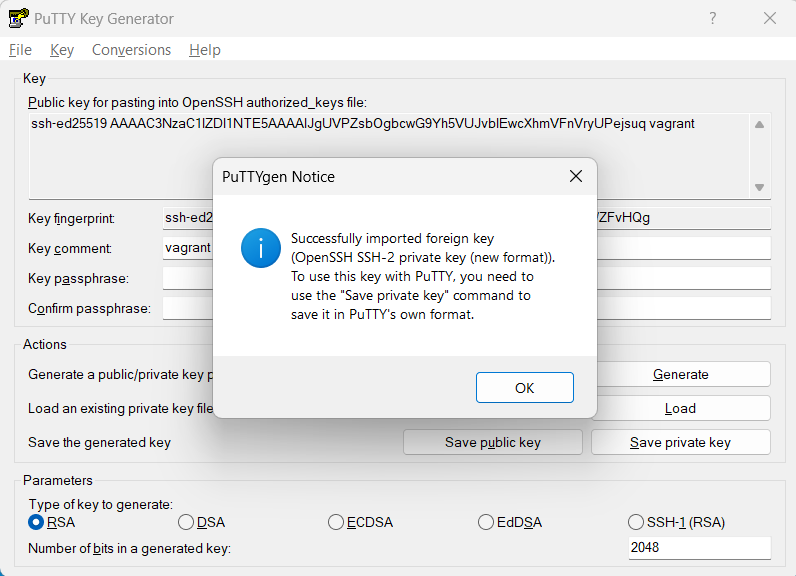
![]() passphrase là password bảo vệ private key
passphrase là password bảo vệ private key
→ ai có private key này đều SSH vào được máy ảo → cần có thêm password để hỏi khi insert private key vào
→ không nhập đúng passphrase thì không insert private key được
→ không cần → bỏ qua → chọn Yes → save lại thành .ppk tên tùy ý
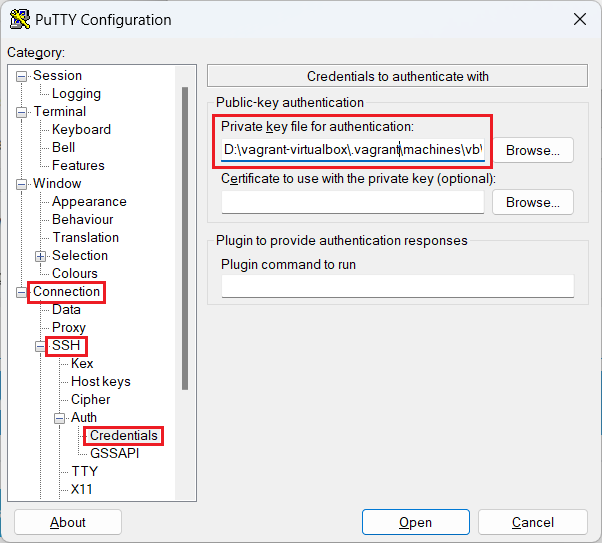
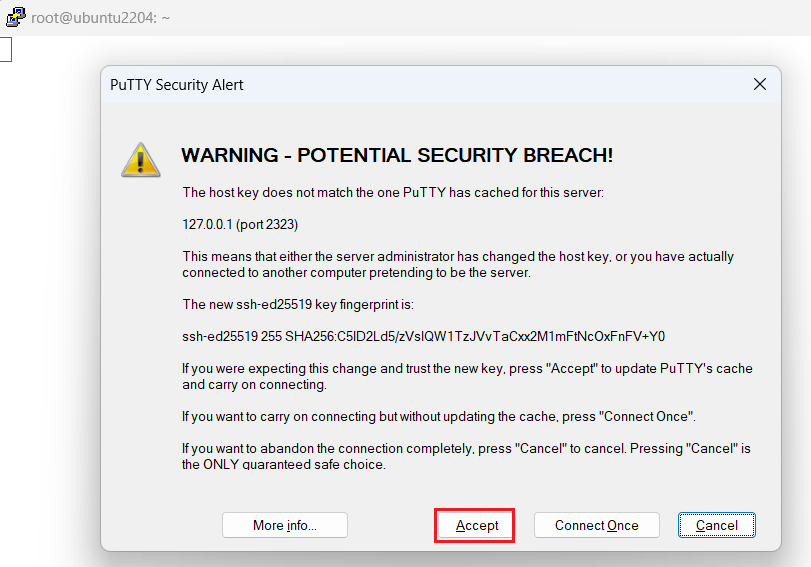
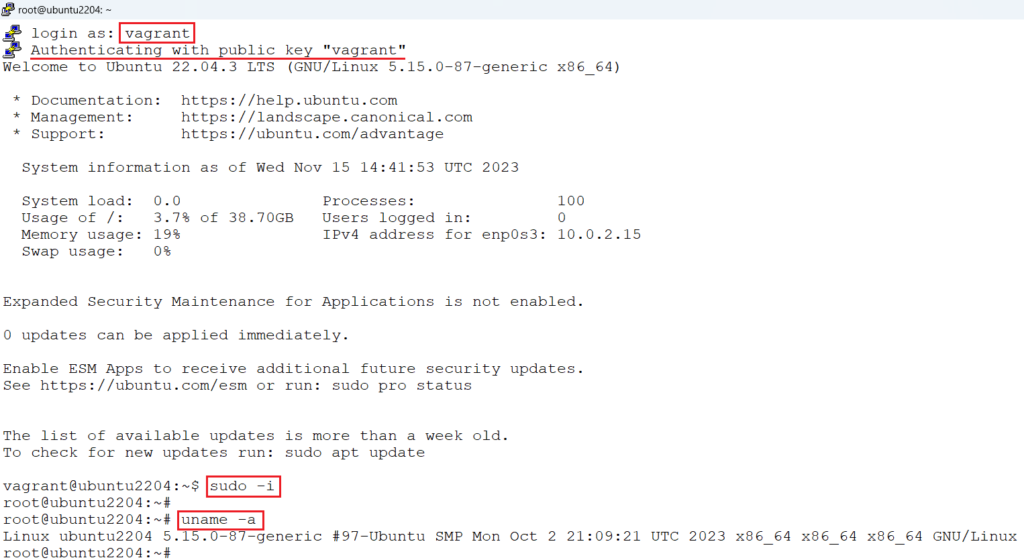
![]() Putty chứng thực = key
Putty chứng thực = key
3. Putty móc vào máy ảo chạy Vagrant trên VMware Workstation
Cách 1 – SSH trực tiếp vào máy ảo xài card mạng NAT
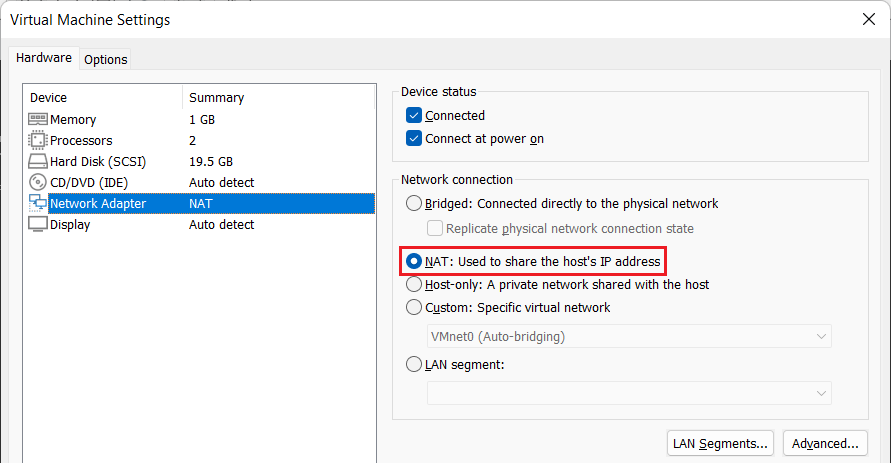
![]() Máy ảo có card mạng NAT
Máy ảo có card mạng NAT
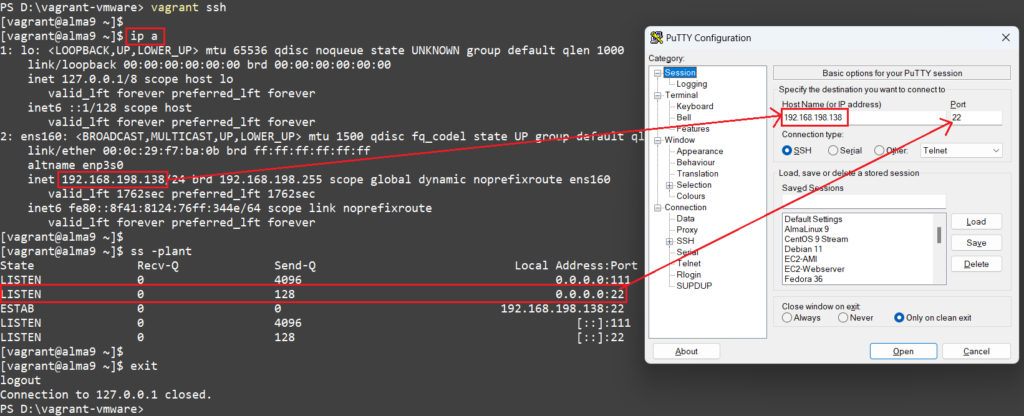
![]() SSH trực tiếp = IP của máy ảo chạy card mạng NAT + Port 22 mặc định thường k thay đổi
SSH trực tiếp = IP của máy ảo chạy card mạng NAT + Port 22 mặc định thường k thay đổi
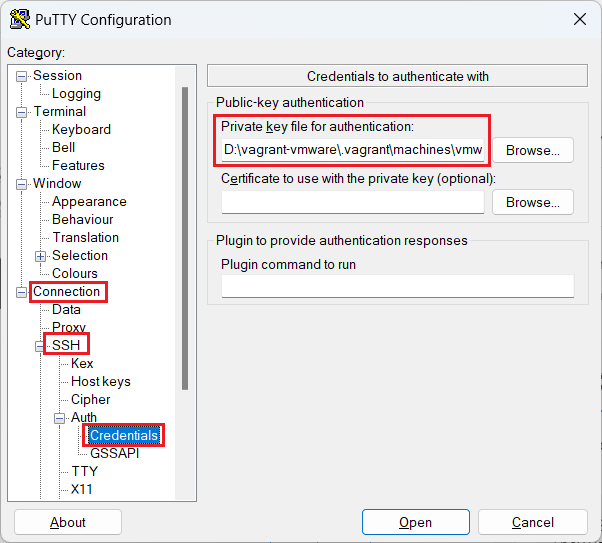
→ chèn private key đã xài PuttyGen convert sang format .ppk của Putty

![]() Tạo máy ảo = tay → không có port forwarding của Vagrant → xài cách này
Tạo máy ảo = tay → không có port forwarding của Vagrant → xài cách này
Cách 2 – SSH = Port Forwarding của Vagrant
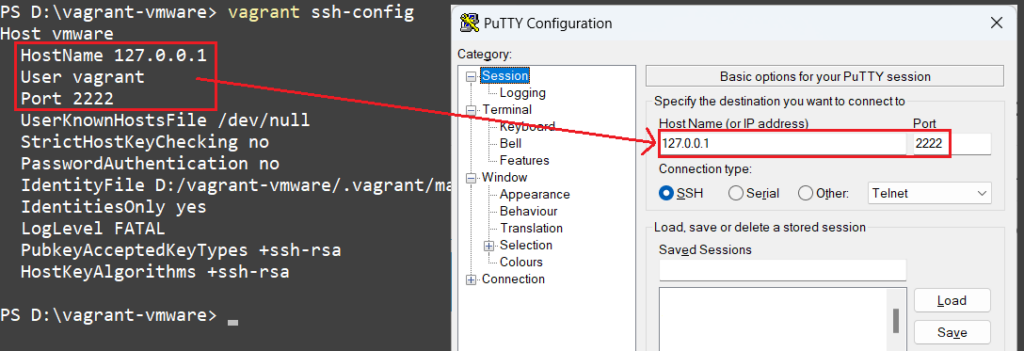
→ chèn private key đã xài PuttyGen convert sang format .ppk của Putty

8. Chụp hình máy ảo (take snapshot)
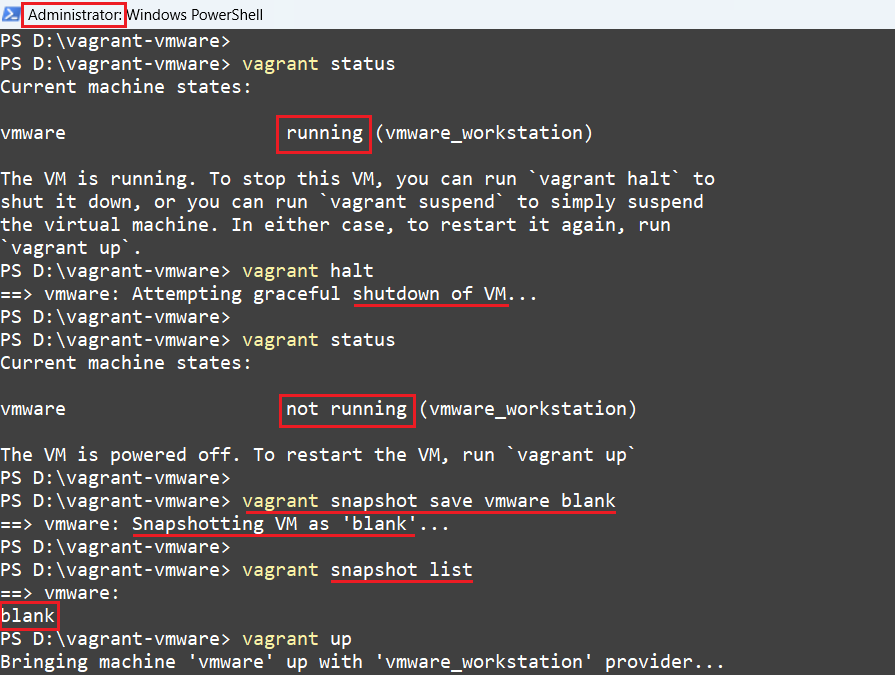
![]() Máy ảo sau khi cài cắm + cấu hình thành công + chạy ngon lành cành đào
Máy ảo sau khi cài cắm + cấu hình thành công + chạy ngon lành cành đào
→ chụp hình (take snapshot) máy ảo lại
→ lỡ sau này cấu hình hư + máy bị lỗi không chạy được → quay lại trạng thái đã chụp hình (revert) sẽ có cảnh cũ người xưa.
![]() Chụp hình máy ảo đang chạy sẽ tốn nhiều RAM, CPU, đĩa cứng + chạy khá lâu
Chụp hình máy ảo đang chạy sẽ tốn nhiều RAM, CPU, đĩa cứng + chạy khá lâu
→ tắt máy ảo rồi chụp hình sẽ nhanh hơn nhiều lần + ít tốn đĩa cứng.
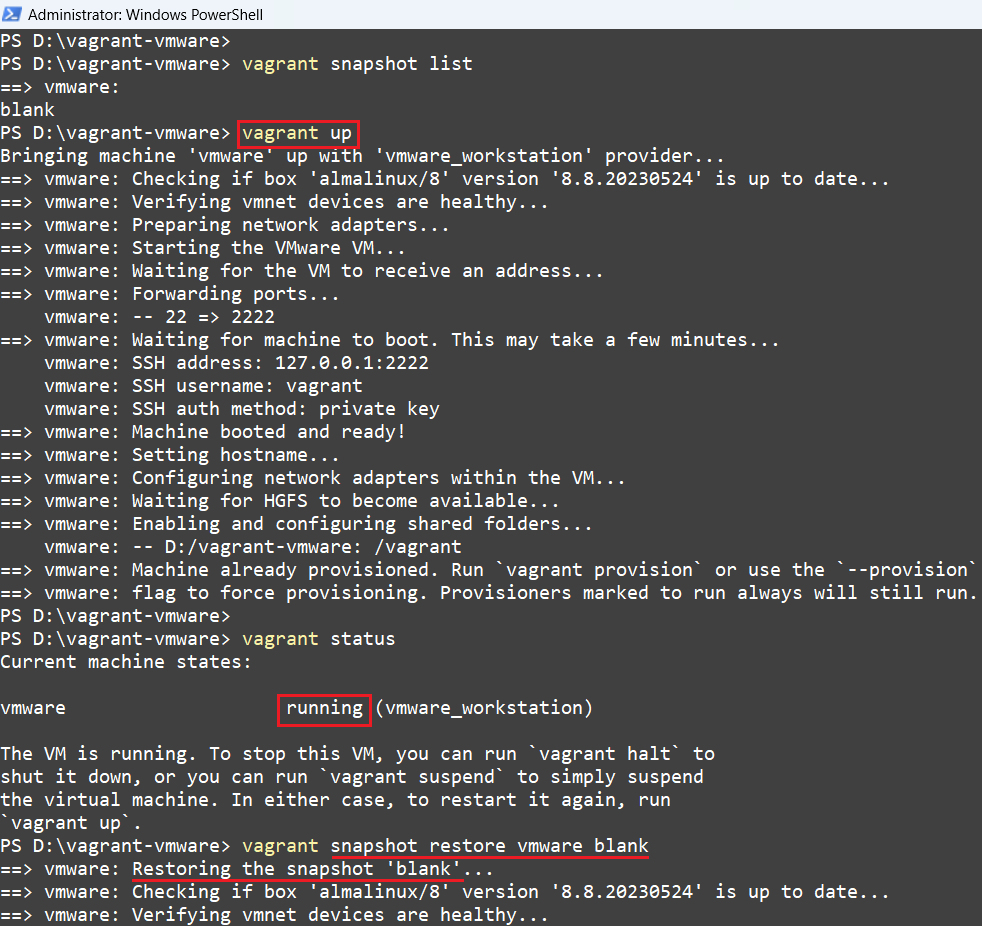
1. Chụp hình máy ảo trên VMware Workstation = tay
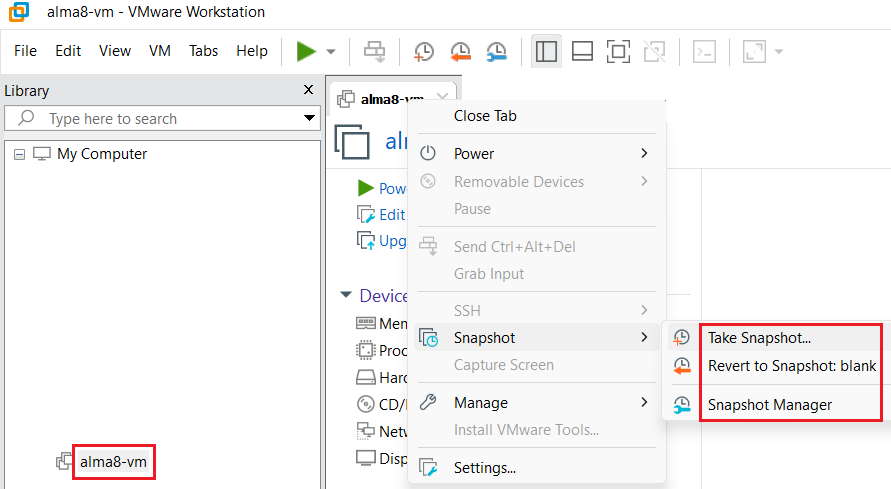
![]() Nếu có nhiều bản snapshot thì vào Snapshot Manager chọn cái nào để revert lại
Nếu có nhiều bản snapshot thì vào Snapshot Manager chọn cái nào để revert lại
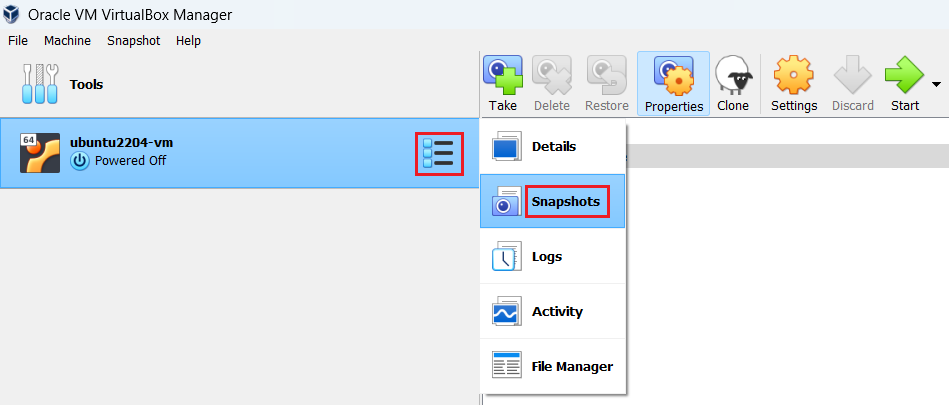
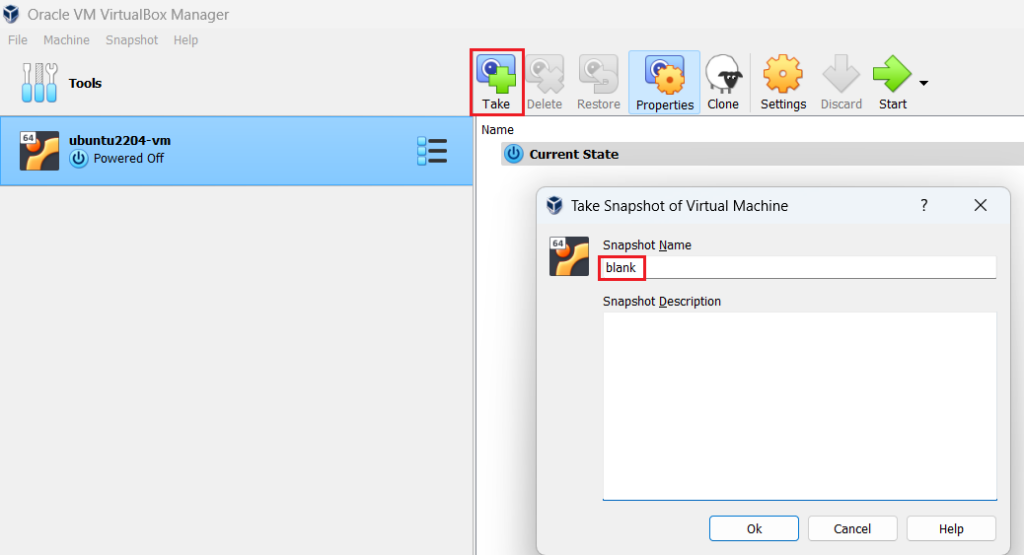
2. Chụp hình máy ảo trên VirtualBox = tay
